Kids Art Cart, Storage System, and Organization Tips

Art is amazing for kids to create and explore, but organizing art supplies can be daunting for parents and teachers. Thankfully, a rolling art cart is a simple solution! Over the past decade, we’ve attempted various arrangements, and art carts have the best organization system. I’ll share how they give kids autonomy and tips for minimizing art clutter.
When you go through this post, please remember that it’s normal for a kids’ art space to be a work-in-progress. Organizing children’s crafts and school supplies as they grow takes brainstorming and practice, so I hope these ideas can help!
Chalk Academy is reader-supported. Some of the links are affiliate links. When you buy something through an affiliate link, we may earn a very small commission at no cost to you. Details here.
Benefits of an organized kids art cart and workstation
Independence: Like most busy parents, I don’t want my kids to ask me to open or find materials 100 times a day. This is why every art supply is in an open container and has a designated spot in our art cart. The more they can do for themselves, the more they learn, and the more time we all have for other important tasks.
Creativity: Having easily accessible art supplies encourages my kids to have fun making whatever they want. They don’t have to ask me for permission because I leave age-appropriate materials in their art station and reinforce where their “yes space” is for artwork.
Simplified clean-up time: My kids understand where things need to go by having consistent places to put things. Of course, they sometimes need reminders and positive reinforcement to clean up. But even at a young age, an organized art cart makes it possible to give them this responsibility.
How our kids art station changed from toddlerhood to the elementary years
Before I share our current setup, I’ll show you how the area has changed over the years. Our kitchen, dining, and living rooms are part of an open-concept floor plan. We don’t have space for an extra art or playroom.
Although my kids could easily leave a panoramic mess (and sometimes do), my husband and I are adamant about not letting “kid stuff” take over the house for our sanity. Therefore, organization is the foundation of our kids art station!
Simple art baskets for toddlers
When my children were younger, we set up a little art station beside their small table. This was the original mini art station.
The simple setup worked well when both of my kids were under five.
By placing the basket atop a shelf, my son could not reach it while crawling and mouthing.
However, in hindsight, I would nix all markers so they could focus on using colored pencils or crayons. Limited options are better for younger children.
Pencils and crayons give proprioceptive feedback with use; depending on the pressure applied, kids will discover light versus dark results. This feedback teaches cause and effect and also encourages coordination and concentration.
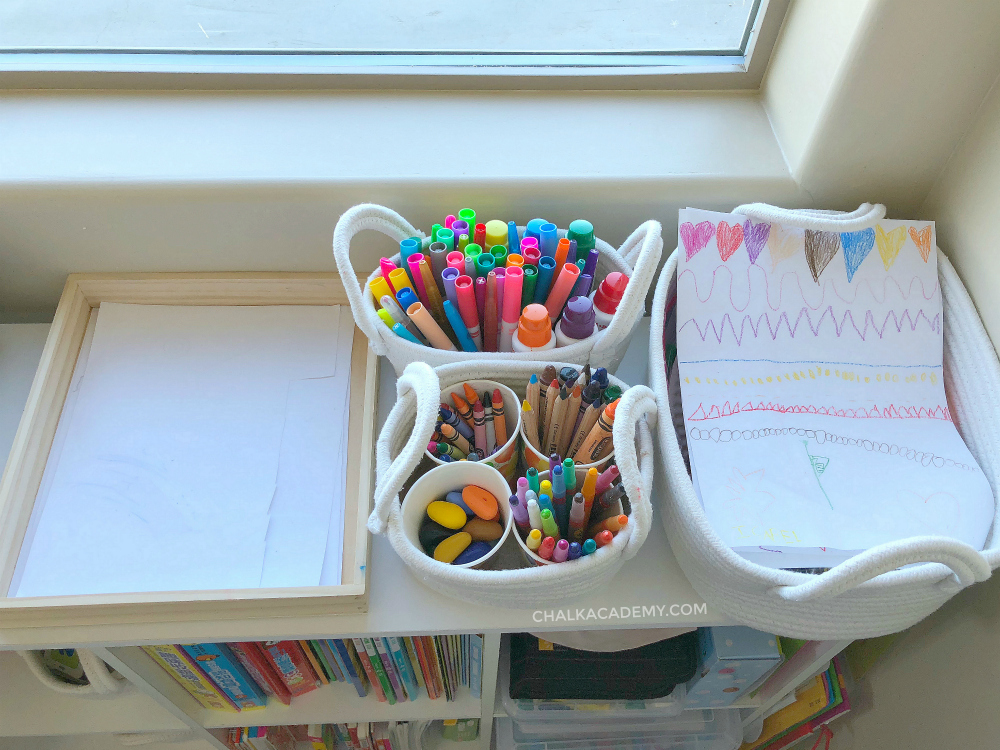
From left to right:
- Paper tray
- Small baskets with handles so that little hands could carry them independently to the table
- Small paper cups separated the supplies to make them easier to find.
- Basket with limited favorite drawings and crafts to minimize hoarding and clutter
Despite this designated station, my daughter carried everything back and forth between this little table and our dining table.
In addition, my older child constantly asked for more “grown-up” art supplies.
Small kids table and art cart
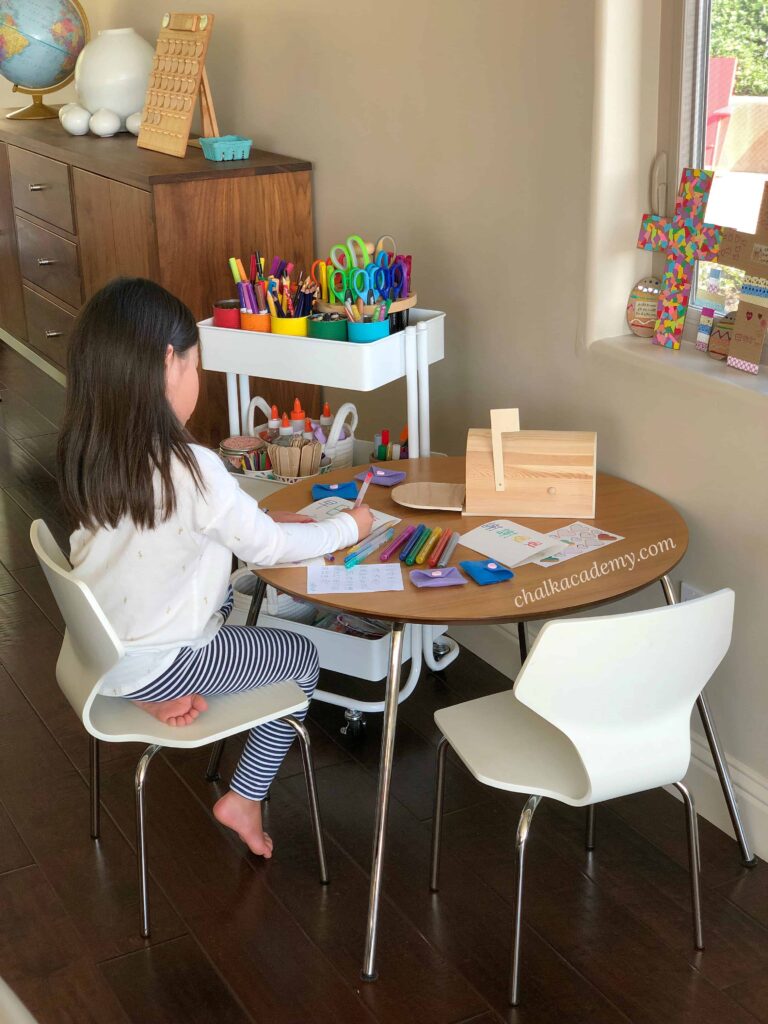
Then we tried moving the little table closer to the main dining table and got a rolling art cart.
The art cart was a game changer (details below), but my kids continued to prefer our dining table, which gave them more space!
So, for the past year, we’ve accepted that our dining table is also our kids’ desk, homework, and art area.
Now, we have two art carts beside our kids’ self-serve water, snack, and cleaning station.
Kids art storage essentials
Secrets to our successful dining room art center:
- Kids art cart
- Labeled art storage compartments
- Regular de-cluttering system
Compartments are necessary; these are the bones of our art storage system!
- Art cart with wheels for portability; similar here and here
- Open containers for access and compartmentalization
- Upcycled tin cans painted with a few coats of acrylic paint. These are perfect for holding writing and drawing utensils upright so you can easily find the necessary color
- Recycled fruit baskets from the farmer’s market
- Our favorite cotton rope baskets!
- If you don’t have these recyclables on hand, here are some inexpensive solutions:
- Zipper storage bags – Although we have many supplies stored in plastic Ziploc bags, we have been transitioning to these durable, reusable silicone bags
- Labels – Essential for organizing and reminding my kids to speak Chinese, their minority language
- Free printable art and school supply labels in English, Chinese, Pinyin, and Zhuyin!
- DIY with painter’s tape and Sharpie marker
- Multilingual label maker if you prefer not to write
I’m going to show you what we have inside everything now!
However, please do not feel you need to get all these materials. Honestly, we would have far less if we completely refused all gifts from friends and family!
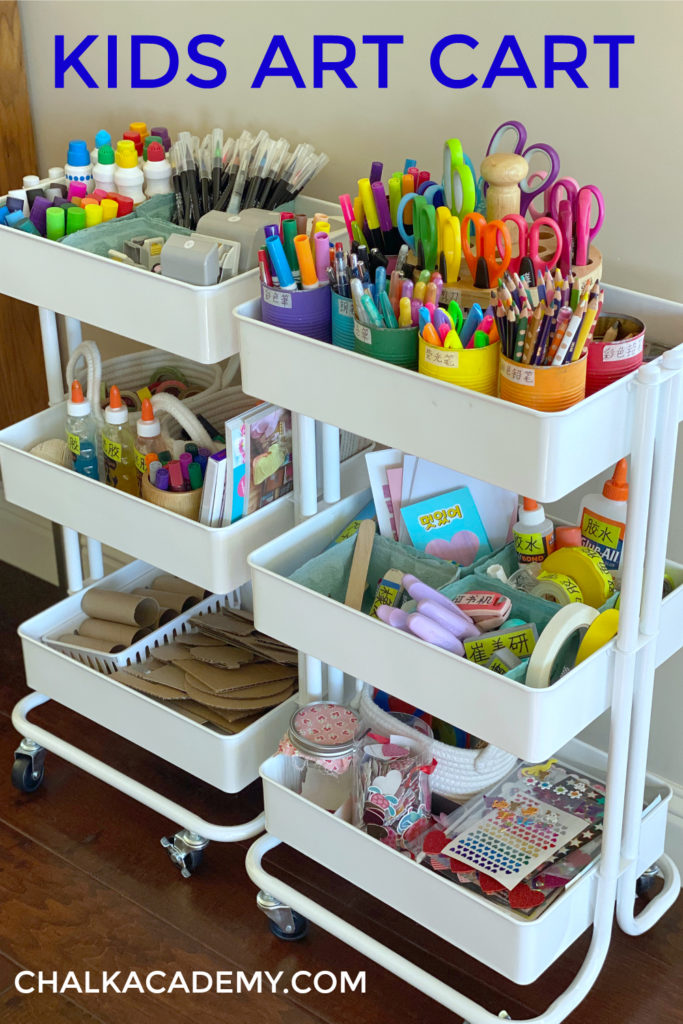
Inside our kids art cart
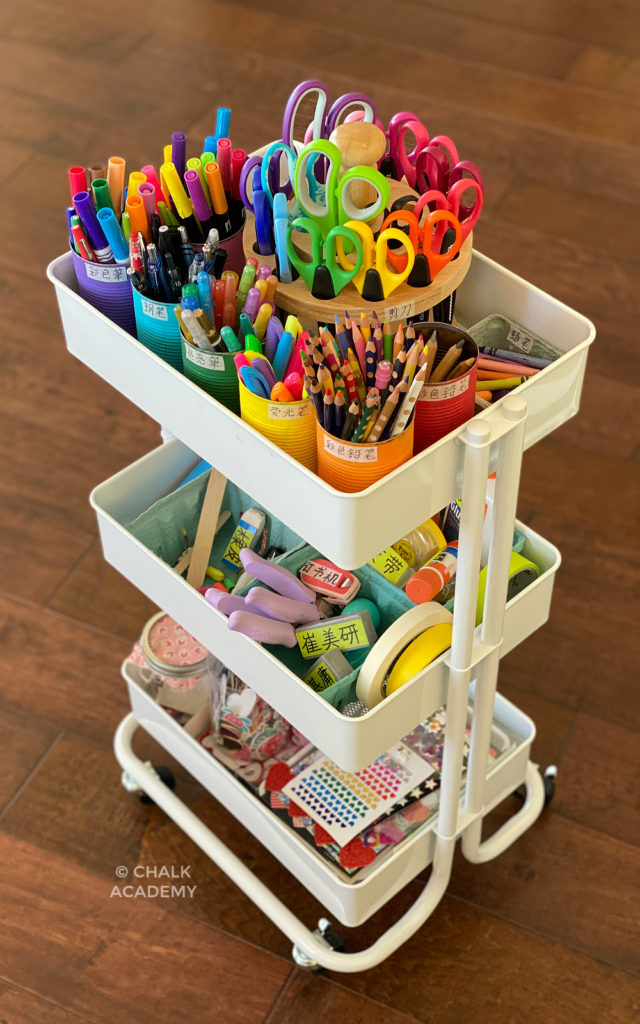
Art Cart #1: Commonly Used Kids School Supplies
Art carts are one of the best inventions because they have a small footprint, and my kids can easily wheel them to any seat on the table.
Our first art cart contains my kids’ daily supplies for homework, writing, and doodling.
Depending on your child’s age and developmental level, I strongly suggest limiting options so they are not overwhelmed and have a better chance at cleaning up.
I only include items I can trust my children to use independently.
Therefore, Sharpie markers and paint are stored far, far away.
Until my toddler son becomes more mature, those art supplies require adult permission and supervision.
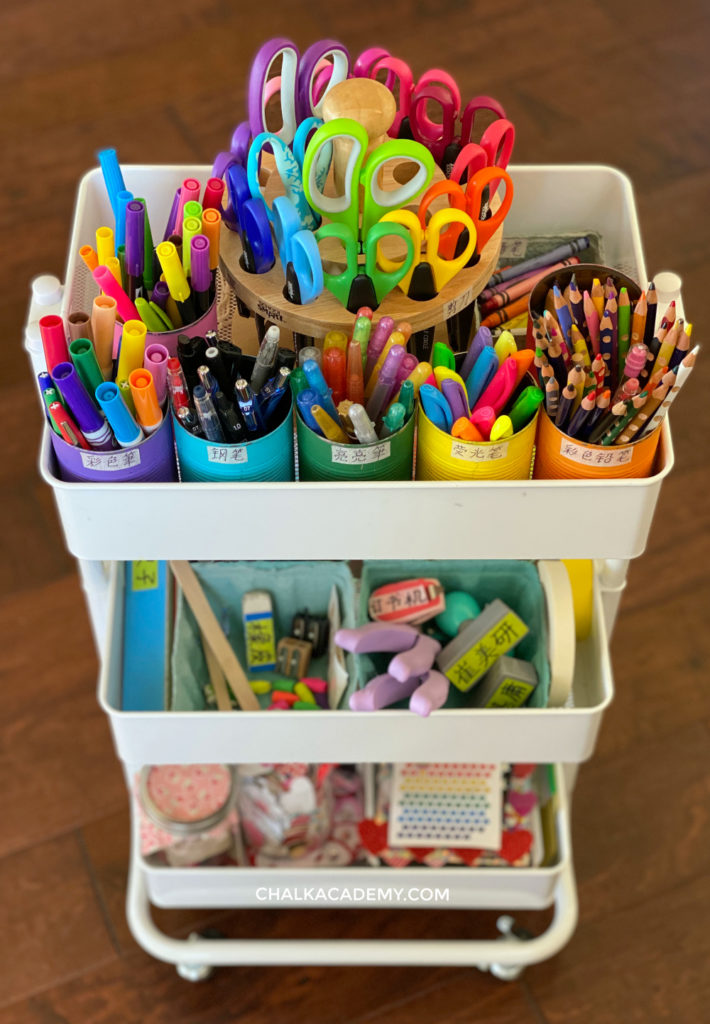
Top art shelf:
- Regular scissors and a set of fun edger scissors with a spinning caddy that we received as a gift (similar here)
- Prang groove triangular coloring pencils for my 6-year-old daughter
- Lyra triangular coloring pencils for my 3-year-old son
- Sharpie highlighters
- Glitter gel pens
- Black and blue pens
- Assorted markers
- Rock crayons and regular crayons
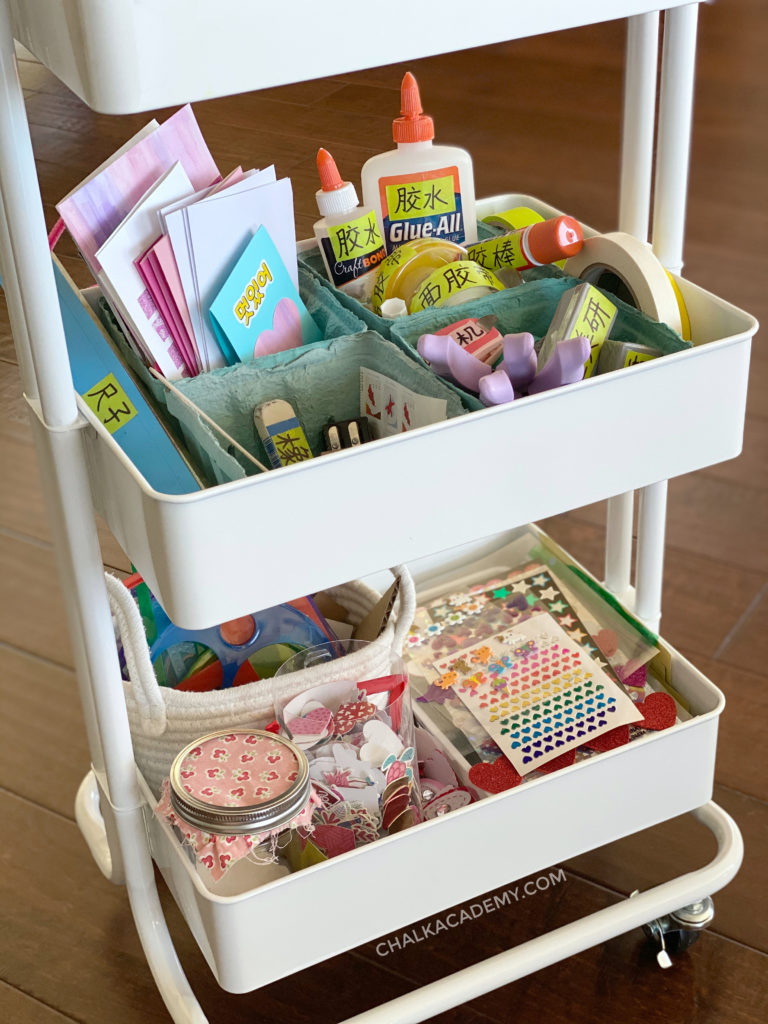
Middle art shelf:
- Rulers
- Erasers, pencil sharpeners
- Stamps and envelopes (eg, handmade greeting cards for writing practice and pen pals)
- Multi-purpose glue, craft tacky glue, glue stick, single-sided and double-sided tape , painter’s tape, white-out
- Hole punchers and stapler
Bottom shelf:
- Shape stencils
- Various stickers (eg, bilingual sticker learning activities)
Art Cart #2: Special Kids Craft and School Supplies
Here’s a close-up look at our second art cart!
These supplies used to be stored away, but now I feel comfortable offering more materials to both children.
Top art shelf:
- Dot markers
- Tempera paint sticks
- Watercolor brush pens
- Various small and large shape punchers
Middle art shelf:
- Cotton string
- Various glitter glue
- Washi tape
- Puffy paint (see examples and tips for creating tactile Chinese and Korean words here as an alternative to Montessori sandpaper cards)
- Oil pastels
- Craft books:
Here’s another view of the art cart where you can see the middle shelf more clearly.
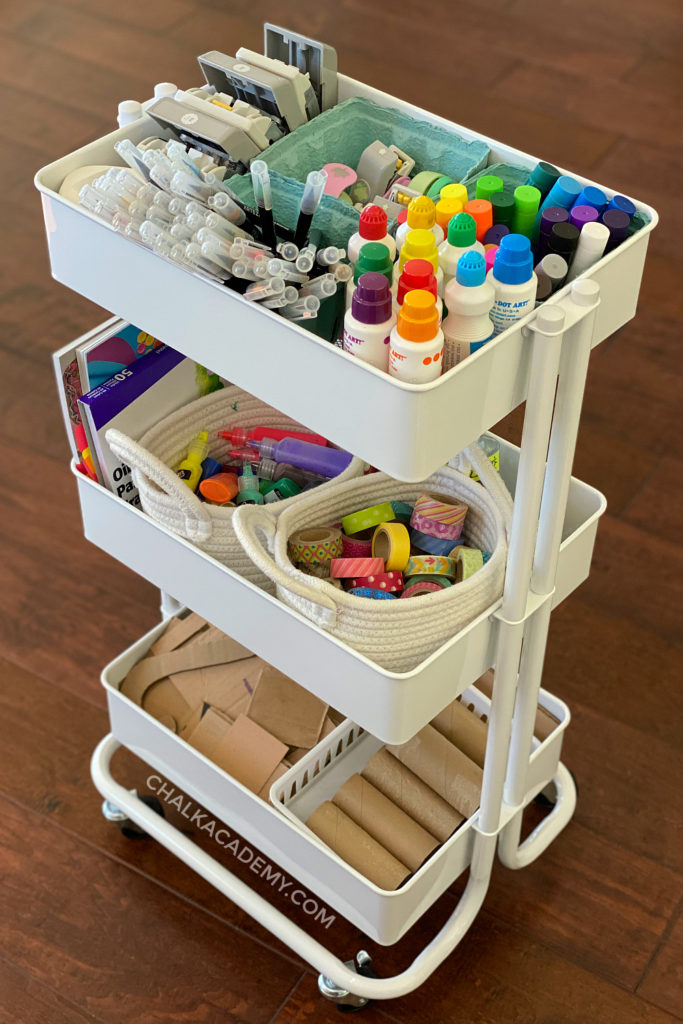
Bottom art shelf:
- Recycled cardboard pieces, some cut into interesting shapes
- Cardboard toilet paper roll in a tray
We encourage the kids to make recycled crafts and limit paper waste whenever possible.
By putting recyclables on this visible, open shelf, they are more likely to use it than new paper stored in our art cabinet.
Labeled art storage system with compartments
If you have limited space like us, a dining cabinet is a sleek way to hide art materials in an organized, functional, and stylish way.
I’ve moved things around a few times to find the most logical placement for my kids. Here’s the “behind-the-scenes” of an organizing frenzy!
Inside our dining cabinet-turned-art storage system!
Here’s a peek inside our art cabinet! Like our art carts, everything is labeled clearly in Chinese and sometimes English.
Left side of the cabinet
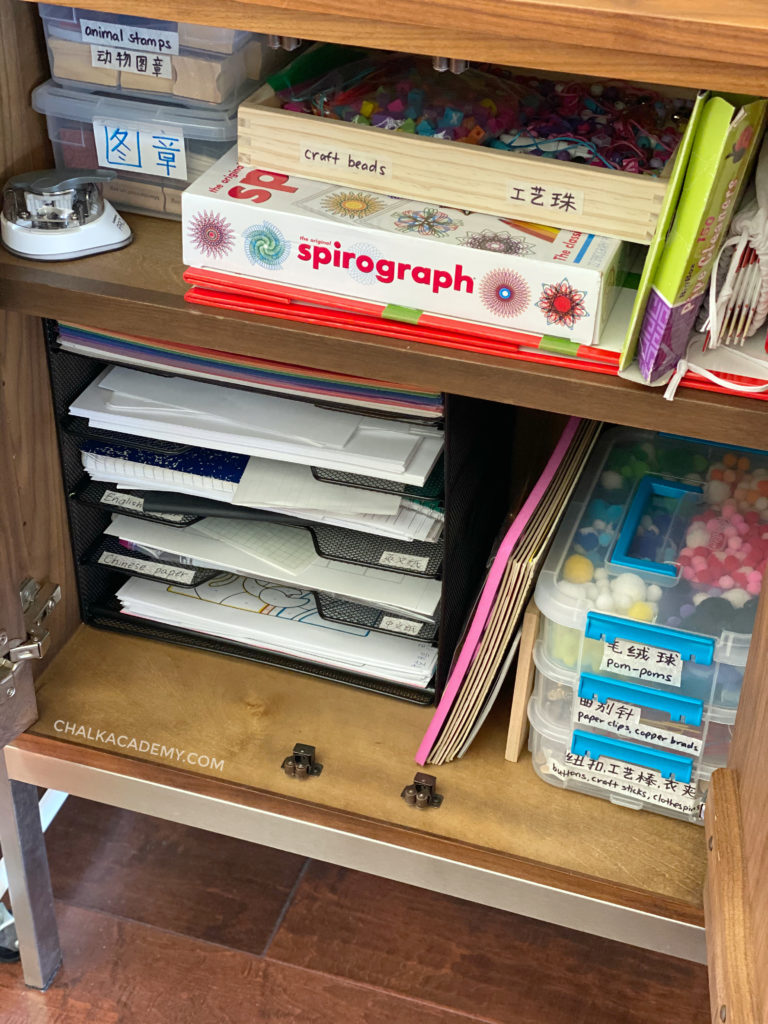
Top shelf:
- Animal stamps
- Chinese reward stamps (simplified Chinese, traditional Chinese)
- Paper corner cutter
- Craft beads
- Spirograph set
- Pipe Cleaners
- Mini Velcro Dots
- Magnetic tabletop whiteboard
Bottom shelf:
- 5-tier paper tray (similar here and here)
- Colored construction paper
- Blank white paper
- Lined paper for English writing
- Grid paper for Chinese writing (printable Chinese writing worksheets here)
- Chinese coloring sheets from my Chalk Academy website
- Korean Hangul alphabet magnets
- Chinese character magnets
- 3-tier clear storage latched box
- Pom poms
- Paper clips
- Paper fasteners / copper brads
- Buttons
- Craft sticks
- Large clothespins, mini clothespins
These materials were intentionally moved to the left side of the cabinet to be closer to the art carts and dining table.
Previously, these craft and school supplies were on the opposite side of the cabinet.
After observing my kids more carefully, I realized they were wasting time walking back and forth.
The simple switch has saved time and energy and prevented complaints about something being “too far”!
Center drawers
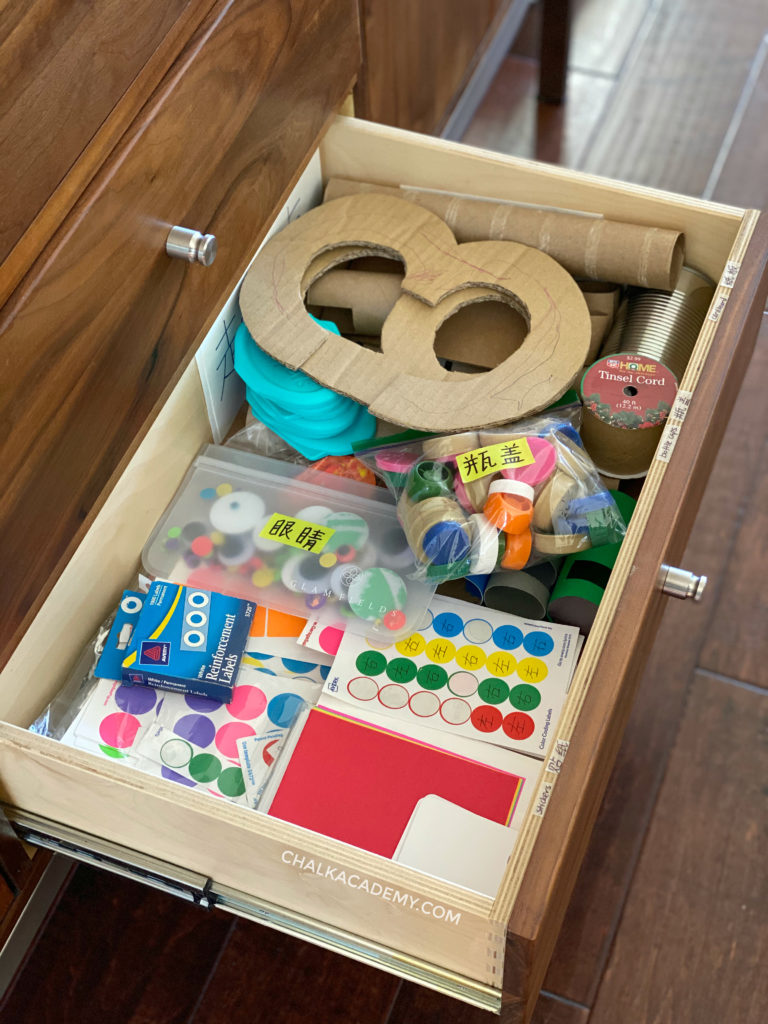
Bottom drawer: dot stickers, googly eyes, bottle caps, baby wipe lids, and more cardboard!
My kids reuse plastic googly eyes by removing them from old crafts.
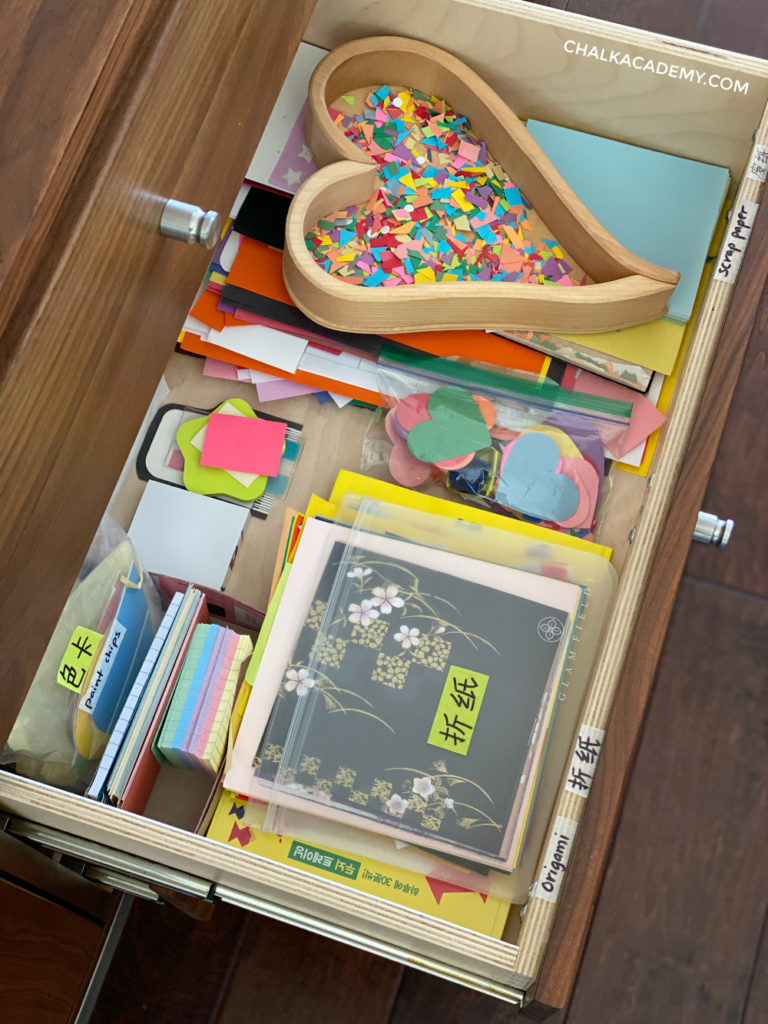
Middle drawer: Since the middle drawer is at eye level for my children, I put the most commonly used paper supplies here:
- Origami paper for my daughter
- Scrap paper and paint chips for both kids
- Index cards
- Post-It Notes
Colorful paper scraps are in a cute, heart-shaped tray to make upcycling more attractive.
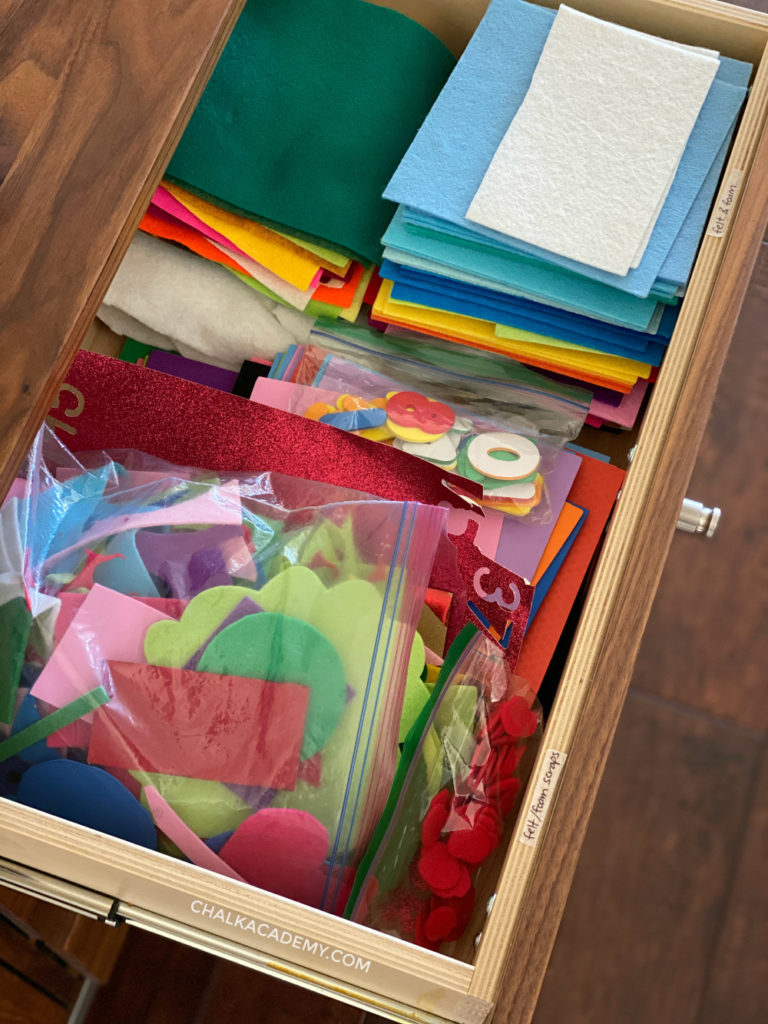
Top drawer: This is filled to the brim with felt and scraps. My children look for scraps before cutting a new piece of felt.
Right side of the cabinet
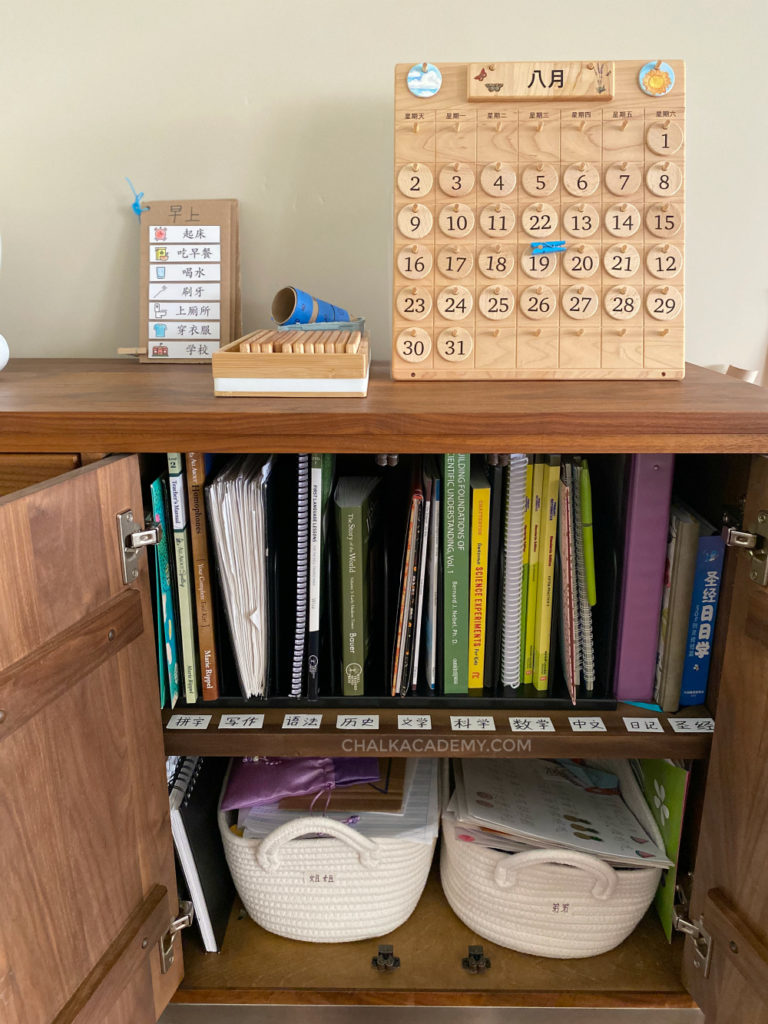
top shelf: black vertical organizer; bottom shelf: baskets for art storage
- Above cabinet: Wood Chinese Calendar, printable Chinese calendar behind it (not visible in this view)
- Top shelf: Daughter’s school work divided into subjects with vertical organizers
- Bottom shelf: Art storage baskets for big sister and little brother (explained below)
Related: Homework Organization for Elementary Kids: Before and After Pictures!
How we organize and declutter art with the “one basket rule”
As I often mention, regular decluttering with my kids is necessary for maximizing efficiency and minimizing frustration in all spaces.
Although not perfectly, we try to minimize duplicates and remove things the kids rarely use.
One art basket rule
To teach my children how to prioritize and not hoard, they each have one art basket to store their favorite crafts. We use this cotton rope basket because it’s lightweight with handles.
As the basket fills, they must determine what to discard to make room for more crafts.
This teaches them to practice letting go of sentimental clutter.
We’ve had this “one basket rule” for a few years, and my daughter sorts through her art basket monthly. My son is trying, too.
Cleaning before eating
Since this table is used for everything, my kids are encouraged to clear the table before each meal by putting completed projects in appropriate baskets.
Incomplete projects can be placed on a large bowl atop the dining/art cabinet.
Occasionally, work can be left on the corner of the table, but this can become a slippery slope to clutter.
Then, we spray the table with mild dish soap mixed with water and microfiber cloths.
Stubborn Sharpie marker stains are removed with the Magic Eraser, which truly is magical!
We’re still figuring out what to hang above the dining/art cabinet, and I’m open to any suggestions you might have. I’ve been considering framing some of my kids’ art pieces or hanging family pictures, but I’m waiting for the right inspiration.
Anyway, I hope it was helpful to see the details and thought process behind our kids’ art carts, storage systems, and organization tips!
Do you have a designated art station for your kids?
What does art look like in your home? What strategies have worked or flopped? I’d love to hear about your family’s experience! Please feel free to share in the comments below.
Wondering if the cart you have is magnetic. Can you stick magnets to the outside for decoration or additional storage?
Hi Kelley! Yes this cart is magnetic. We currently have this magnetic cup attached to the cart for crayons. Hope that helps 🙂
Thank you for yet another great post Betty! We are in the midst of moving house and I am very excited working on their activity+home-school room! Your posts are precious and I’m carefully reading all of them! I’ll check in with you privately on questions.. but want to say that you are a gem! Thank God for your graciousness in sharing your experiences. ❤️
Thank you for the detailed tour. I have a lovely cabinet in our dining area that came with the house, and I’ve envisioned using it as an art center, so it was great to see how your cabinet is being used!
We also have a one basket rule for artwork, but I’m thinking I need to downsize the basket. 😛
Hi Betty,
Thanks for all the useful information! We have similar art carts but I’m re-vamnping them of late. I thought about tin cans, but wondered if the edge was sharp? Any suggestions or do you find that the kids do fine with a usual can that’s been opened with stanadard can opener? Sorry for the strange question — just curious.
Thank you from a fellow PMGer
I had the same question regarding the tin cans especially since I have a fairly large range in ages of my kids with youngest being almost 2. Thanks for asking this question. Will wait for Betty to respond.
Hi Doreen and Jennifer! Sorry for just seeing this question! I was worried about that as well, but our tins don’t have any sharp edges inside. When I was younger and my dad DIY’d these cans, I remember he used a few layers of masking tape to cover the inner edge. If you feel comfortable, you can try using that as a precaution for your little one!
Hi!! I just found you Betty and I am SO grateful!! Thank. you for all of you work! Doreen and Jennifer, I loved this question and don’t think it is silly at all ;). I got this can opener (https://www.pamperedchef.com/shop/Favorites/Favorites/Smooth-Edge+Can+Opener/2759) for a gift and now looking at the price I realize this might sound nuts, but the smooth edge can opener has been sooooooo helpful for us. We use tin cans for all sorts of stuff- play, organization, impromptu drum sets, good old fashioned can phones connected by a string…anyone remember those? Fun to have different sized cans for things- 28 oz cans, 14 oz cans and the tiny tomato paste ones. Cheers!
Also, you are inspiring me Betty! It would be such a fun reward to start integrating more Japanese for us in all things as we enter a new iteration of organizing, decluttering, and streamlining with a move to a new home today! Thanks for showing me how to look forward to it all! Blessings, Kimberly
Congratulations on your new home, Kimberly! All the best to you and your family in this new chapter 🙂
Hi Kimberly! Really appreciate you for taking the time to share the can opener recommendation! I was just looking to replace my super old can opener, too. My kids love all of these classic activities with tin cans, too. It’s amazing how the simple things are the most timeless! 😀
For anyone in need of bilingual labels for their art carts, I created printable labels in Chinese and English plus a tutorial for painting the cans in this post!
Hi Betty,
Just want to say thank you so much for taking the time to write and post! I’m so inspired by your ideas and creativity!
Absolutely love the art carts and the one basket rule! It’s so important to teach them to let go. 🙂
I’m raising a bilingual kid myself, I can imagine how much effort it takes to raise such brilliant trilingual kids like yours. Hats off to you and your husband!
Take care and look forward to more amazing posts!
Hi Katie! I just got a chance to catch up on messages and wanted to thank you for your thoughtful note! I’m glad to hear the posts are helpful and excited to hear that you’re raising a bilingual child, too! I hope the ideas can continue to help your family! 🙂
I love your kids art carts!! i’ve added like half these things into my amazon basket. Thank you so much for taking the time to write these posts, i know it takes up so much time, so I wanted to comment my appreciation. And also your art cart is so inspiring. I love card making and paper crafting and can’t wait till my daughters are older so we can craft more. For now I will order the popular dot stickers and glue sticks and velcro to start. =) Thank you Betty!!
Hi Sophia! I really appreciate your kind note! I hope you and your family is safe during this time especially as you might be working in the hospital. And I’m glad that you were able to find a few things that your daughters can enjoy for now! Praying for good health and protection over your family!
Hi!! Love the art cart (and your posts!). Where/how do you store all the artwork that they’ve created? I’m struggling with what to do with the overwhelming amount of artwork I have accumulated.
Hi Michelle! Thanks for your question. Toward the end of the post are photos of my kids’ art storage. They get 1 basket max each for storage. If it doesn’t fit, then they go through and see what to let go. They also hang a few pics on the wall with painter’s tape. Hope that helps!